Avocado Fertilizer and Mulching Guide: How to Improve Tree Growth, Root Health and Fruit Production
Unlock higher Hass avocado yields with smart avocado fertilizer and mulching techniques. Learn root protection, timing, and soil health tips for maximum profit.

Avocado Fertilizer and Mulching: How to Improve Tree Growth, Root Health and Fruit Production
Walk into two neighbouring Hass avocado orchards in Murang’a, Embu, or Kisii, and you will often see two completely different stories unfolding. Both farmers bought seedlings around the same time. Both farmers regularly purchase commercial fertilizers. Yet one orchard displays thick, deep-green canopies, strong flowering, and heavy clusters of uniform fruits, while the other struggles with sparse yellowing foliage, heavy flower drop, twig dieback, and small, unmarketable avocados that drop prematurely.
The immediate reaction for many farmers when trees look pale or stunted is to purchase another bag of top-dressing fertilizer or spray a strong foliar feed. When the tree fails to respond, or worse, begins to shed more leaves, frustration sets in. The missing link in most unproductive orchards is not simply a lack of applied nutrients. It is a fundamental misunderstanding of how an avocado tree takes up feeding, how its delicate root system functions, and how soil physical structure, moisture levels, and mulching directly govern nutrient availability.
An avocado tree is not a maize crop or a eucalyptus tree. It has a unique, shallow root architecture that lacks true root hairs. Because of this specialized biology, applying high concentrations of chemical fertilizer around the stem or letting the topsoil dry out into a hard crust completely halts nutrient uptake. Fertilizer application cannot be separated from the physical condition of the soil, organic matter levels, root health, and moisture management. Understanding how fertilizer, soil chemistry, root anatomy, and mulching work together is the single most effective way to build a profitable, long-term Hass avocado enterprise in Kenya and across East Africa.
Understand What Avocado Fertilizer Actually Does
Feeding an avocado tree effectively requires understanding how the plant moves raw elements from the soil solution into its vascular system to build wood, leaves, flowers, and fruit. Avocado leaves act as the solar-powered factories of the tree, manufacturing carbohydrates through photosynthesis. The roots serve as the root system anchor and absorption network, taking up dissolved minerals and water.
When a farmer applies fertilizer, they are not directly feeding the tree in the way one feeds livestock. They are supplying mineral elements to the soil solution so that active root tips can absorb them. If those root tips are damaged, waterlogged, or dried out, no amount of applied fertilizer will enter the tree.
Major Nutrients and Their Practical Roles
Nitrogen (N): Nitrogen drives vegetative growth, leaf production, and canopy expansion. It forms the core of the chlorophyll molecule responsible for photosynthesis. In young trees, nitrogen establishes the structural framework of branches. In mature bearing trees, nitrogen fuels the flush of new growth that carries future fruiting sites. However, excessive nitrogen applied right before or during flowering causes the tree to drop flowers and young fruit in favour of producing soft, leafy shoots.
Phosphorus (P): Phosphorus supplies energy transfer within plant cells and is critical for root division, root elongation, and early orchard establishment. It plays a key role during early spring or post-dormancy root flushes and flowering. Without adequate phosphorus, root systems remain small and inefficient, rendering the tree unable to access water and other minerals.
Potassium (K): Potassium is the primary driver of fruit size, oil synthesis, dry matter content, and internal fruit quality. It regulates water movement within the tree and controls the opening and closing of stomata on the leaf surfaces. Bearing Hass trees extract large quantities of potassium from the soil as fruits mature. Low potassium leads to small, low-value fruits, leaf margin necrosis, and poor post-harvest shelf life.
Calcium (Ca): Calcium is an essential structural element that strengthens cell walls throughout the trunk, branches, leaves, and fruit tissue. Strong cell walls build natural resistance against fungal infections like anthracnose and stem-end rot, while reducing internal fruit breakdown during cold storage and export shipping. Because calcium moves slowly within plant tissues via water transport, a steady supply in moist soil is vital during early fruit development.
Magnesium (Mg): Magnesium occupies the centre of the chlorophyll molecule and acts as an activator for numerous enzyme processes. It supports energy generation and carbohydrate transport from leaves down to roots and developing fruit. Deficiencies appear as yellow patches between green leaf veins, leading to premature leaf drop and reduced canopy efficiency.
Sulphur (S): Sulphur works alongside nitrogen to synthesize essential amino acids and proteins. It maintains chlorophyll formation, supports vigorous canopy development, and enhances the overall efficiency of nitrogen utilization within the tree.
Key Micronutrients in Avocado Production
Boron (B): Boron plays an indispensable role in cell division, pollen tube growth, pollen viability, flower fertility, and initial fruit set. A minor deficiency in boron can cause extensive flower drop, deformed or unevenly shaped avocados, and internal fruit discolouration, even when major nutrients are supplied in large quantities.
Zinc (Zn): Zinc is necessary for hormone synthesis, specifically auxin, which regulates shoot elongation and leaf expansion. Zinc deficiency causes “little leaf” condition, where new leaves emerge small, narrow, mottled, and bunched together in tight rosettes at branch tips.
Iron (Fe) and Manganese (Mn): Both iron and manganese act as catalysts in chlorophyll formation and enzyme reactions. In high-pH, alkaline, or poorly drained waterlogged soils, iron and manganese become chemically locked, resulting in severe interveinal yellowing (chlorosis) on younger foliage.
| Nutrient | Primary Function in Avocado | Key Stage of Highest Demand | Visual Symptom of Real Deficiency |
| Nitrogen (N) | Vegetative growth, leaf canopy, chlorophyll construction | Vegetative flushes (post-harvest & post-set) | Uniform pale yellowing of older leaves first |
| Phosphorus (P) | Root architecture development, cell division, energy transfer | Planting, early root flushes, pre-flowering | Dull green foliage, purple-red leaf undersides, weak root systems |
| Potassium (K) | Fruit sizing, oil accumulation, water regulation, disease resistance | Fruit expansion to mature sizing phase | Scorching/browning along margins of older leaves, small fruit |
| Calcium (Ca) | Cell wall density, structural strength, fruit firmness, shelf life | Root flushes and early fruit cell division | Weak fruit skin, internal breakdown, root tip dieback |
| Boron (B) | Pollen tube germination, flower viability, fruit symmetry | Pre-flowering flush through early fruit set | Deformed fruits, seed cavity hollows, brittle shoot tips |
| Zinc (Zn) | Auxin production, leaf expansion, internode lengthening | Early spring shoot flushes | Rosetting, small narrow leaves with interveinal yellowing |
Applying excessive fertilizer introduces severe orchard problems. Heavy applications of nitrogen or soluble chemical salts raise the electrical conductivity (EC) of the soil solution around the roots. Because avocado roots are extremely sensitive to salt, excess fertilizer creates osmotic stress, pulling water out of root cells, burning delicate feeding root tips, and inducing root dieback. Over-fertilizing can also lock out other nutrients; for example, excessive potassium applications inhibit calcium and magnesium uptake, triggering secondary deficiencies despite good soil fertility.
Nutrient Deficiency vs. Poor Nutrient Uptake
One of the most expensive mistakes an avocado farmer can make is assuming that every yellow leaf, small fruit, or stunted branch is caused by a shortage of fertilizer in the soil. A leaf displaying clear symptoms of chlorosis may indeed lack nitrogen or iron within its tissues, but the underlying reason the nutrient is absent from the leaf is frequently unrelated to whether that nutrient was applied to the ground.
                  +-----------------------------------+
                  |   VISUAL LEAF SYMPTOM OBSERVED    |
                  |  (Yellowing, Stunting, Burn Edge)  |
                  +-----------------+-----------------+
                                    |
                                    v
                  +-----------------+-----------------+
                  |      IS NUTRIENT PRESENT IN       |
                  |          SOIL SOLUTION?           |
                  +--------+----------------+---------+
                           |                |
                  YES      |                | NO
                           v                v
      +--------------------+---+       +----+-------------------+
      | ROOT & UPTAKE BARRIERS |       | GENUINE DEFICIENCY     |
      +------------+-----------+       | Apply corrective soil  |
                   |                   | or foliar nutrient     |
                   |                   +------------------------+
   +---------------+------------------+------------------+
   |               |                  |                  |
   v               v                  v                  v
+--+----------+ +--+-----------+ +----+------------+ +---+----------+
| High/Low pH | | Waterlogged  | | Severe Drought  | | Root Rot     |
| (Nutrients  | | Soil         | | (No moisture to | | (Phytophthora|
| locked up)  | | (Root death) | | move nutrients) | | kills roots) |
+-------------+ +--------------+ +-----------------+ +--------------+
The Difference Between True Deficiency and Uptake Failure
A genuine nutrient deficiency occurs when the soil genuinely lacks an adequate reserve of an essential element. In contrast, uptake failure occurs when the nutrient is present in the soil in sufficient quantities, but environmental, chemical, or physical barriers prevent the root system from absorbing it and transporting it to the canopy.
Factors that cause nutrient uptake failure include:
Extreme Soil pH: In soils with a pH below 5.0, phosphorus binds tightly to aluminum and iron oxides, making it insoluble. Calcium and magnesium leach away quickly. In alkaline soils with a pH above 7.5, micronutrients like zinc, iron, and boron become chemically locked up, rendering them unavailable to roots even if present in large quantities.
Soil Compaction and Poor Aeration: Avocado feeder roots require high concentrations of oxygen in the soil pores to fuel respiration and active transport mechanisms. In compacted soils or heavy clay soils lacking organic matter, root respiration slows down or stops, preventing the tree from pulling up nutrients like potassium and calcium.
Waterlogging and Poor Drainage: When water saturates the root zone for more than 24 to 48 hours, oxygen is depleted. This causes root tip death and provides ideal conditions for soil-borne pathogens. Dead root tips cannot absorb water or fertilizer, causing the tree above ground to look dehydrated and starved.
Severe Moisture Stress: Nutrients move into avocado roots dissolved in water via mass flow and diffusion. During dry periods, if an unmulched orchard dries out, nutrient transport stops completely regardless of fertilizer applications.
Root Disease (Phytophthora cinnamomi): The pathogen Phytophthora cinnamomi attacks and destroys feeder roots, turning crisp, white root tips into black, decaying threads. A tree suffering from root rot lacks the root surface area needed to absorb nutrients, displaying yellowing and dieback regardless of fertilizer applications.
Before purchasing fertilizers to correct leaf symptoms, assess root health, soil moisture, drainage, and pH. Adding chemical fertilizer to a tree suffering from waterlogging or root rot will exacerbate root damage by increasing salt stress on the surviving root system.
Soil Testing Before Fertilizer Application
Designing an avocado nutrition strategy without a soil test is like writing a prescription without examining the patient. Soil testing provides a clear baseline of what is occurring in the root zone, preventing costly mistakes such as adding lime to alkaline soil or applying excessive phosphorus where levels are already high.
Key Parameters Revealed by a Soil Analysis
Soil pH: The optimal soil pH range for Hass avocado trees is between 5.5 and 6.5 (measured in water). Within this slightly acidic window, macro and micronutrients remain balanced and available for uptake.
Cation Exchange Capacity (CEC): CEC measures the soil’s capacity to hold onto positively charged nutrients like calcium, magnesium, and potassium. Sandy soils generally have a low CEC and require smaller, more frequent fertilizer applications to prevent leaching. Clay and high-organic-matter soils have a higher CEC and retain nutrients longer.
Organic Matter Percentage: Organic matter improves soil aggregation, water retention, and microbial activity while providing a natural buffer against soil pH changes and salt damage.
Nutrient Ratios: Balance between elements is often more important than absolute quantities. For example, a high ratio of potassium relative to magnesium can induce magnesium deficiency. A soil test highlights these structural imbalances before visual symptoms appear.
Electrical Conductivity (EC) / Salinity: Measures dissolved salt concentrations. Avocado trees are among the most salt-sensitive commercial fruit crops; elevated EC levels indicate potential root burn risk.
       +-------------------------------------------------------+
       |                  ORCHARD DIAGNOSTIC                   |
       +---------------------------+---------------------------+
                                   |
           +-----------------------+-----------------------+
           |                                               |
           v                                               v
+----------+----------+                         +----------+----------+
|  SOIL TEST ANALYSIS |                         | TREE & LEAF DIAGNOSIS|
|  - pH level         |                         |  - Leaf Analysis     |
|  - CEC & Salinity   |                         |  - Canopy Density    |
|  - Organic Matter   |                         |  - Root Health Check |
|  - Base Saturation  |                         |  - Current Crop Load |
+----------+----------+                         +----------+----------+
           |                                               |
           +-----------------------+-----------------------+
                                   |
                                   v
       +---------------------------+-----------------------+
       |      BALANCED NUTRIENT & MULCH PROGRAMME          |
       |  Targeted application matched to tree growth stage|
       +---------------------------------------------------+
Copying a fertilizer routine from a neighbouring farm in another county is counterproductive. Soil types vary widely across East Africa. Red volcanic soils in Kiambu and Nyeri behave differently from alluvial soils in Nakuru or sandy loams in Trans Nzoia. Rainfall patterns, irrigation water quality, tree age, canopy size, and historical yields differ between farms.
To refine a nutrition plan for a bearing orchard, pair soil testing with leaf tissue analysis during the post-harvest period or stable growth stages. Soil testing reveals what is present in the soil, while leaf analysis shows what the tree has actually absorbed into its vascular system. Combining soil tests, leaf analysis, root inspections, and historical production records provides a reliable basis for optimizing input costs and maximizing yields.
Fertilizer Application Methods
Because avocado roots are shallow and spread widely, how fertilizer is placed matters just as much as what type of fertilizer is used.
An avocado tree lacks a single deep taproot capable of pulling up all its water and food requirements. Instead, over 70 to 80 percent of its active feeder roots occupy the top 30 to 40 centimetres of soil, extending outward beneath the leaf canopy and past the dripline. These fine feeder roots are delicate, fleshy, and highly sensitive to localized concentrations of chemical salts.
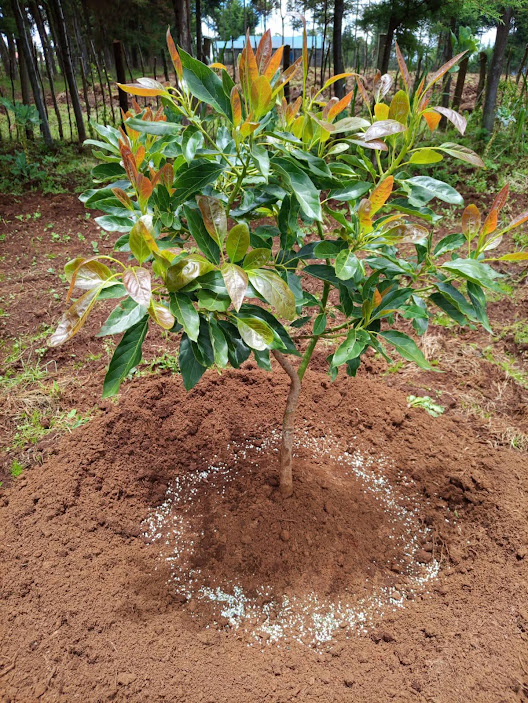
Application Approaches
Surface Ring Broadcasting: Spreading fertilizer in a broad, even band beneath the outer half of the canopy and extending slightly beyond the dripline. This places the nutrients directly over the dense network of feeder roots.
Broadcasting in Closed Canopies: In older orchards where mature tree canopies meet and interlock, feeder roots colonize the entire orchard floor. In this case, apply fertilizer evenly across the whole orchard floor rather than around individual trunks.
Fertigation: Delivering soluble nutrients directly through an automated drip or micro-sprinkler irrigation system. Fertigation supplies low concentrations of nutrients directly to the active root zone with minimal salt shock, improving nutrient use efficiency.
                  TYPICAL CANOPY & ROOT DISTRIBUTION

                             /-------\
                            /         \
                           /  CANOPY   \
                          |             |
                          \             /
                           \           /
                     _______|_________|_______
                    /       |  STEM   |       \
                   /        |         |        \
  ----------------+---------+---------+---------+---------------- Soil Line
  |    NO FERTILIZER |                      |   CORRECT APPLICATION ZONE
  |     TOUCHING     |                      |   Broad band around outer
  |     TRUNK BASE   |                      |   half of canopy extending
  |                  |                      |   past the dripline
  +------------------+----------------------+--------------------+
  |                                                              |
  | ~~~~~~~~~~~~~~~ FINE FEEDER ROOT NETWORK ~~~~~~~~~~~~~~~~~~  |
  |                (Top 30-40cm of soil layer)                   |
  +--------------------------------------------------------------+
Critical Rules for Applying Solid Fertilizers
Never Concentrate Fertilizer in Piles or Small Spots: Pouring cups of fertilizer into localized heaps creates hot spots of extreme salt concentration, burning roots and killing beneficial soil microbes.
Never Place Fertilizer Against the Trunk: Keep chemical fertilizers away from the base of the trunk to prevent tissue damage and entry points for pathogens like Colletotrichum or Phytophthora.
Incorporate Gently or Apply Beneath Mulch: Broadcast fertilizers over moist soil under the organic mulch layer, or lightly rake them into the top layer of soil without damaging shallow feeder roots.
Water After Application: Unless applying fertilizer during steady, light rains, irrigate the orchard after application to dissolve the chemical granules and carry the nutrients into the topsoil solution. Applying chemical fertilizer to bone-dry soil leaves concentrated chemical salts in contact with root tissues, causing dehydration and tip burn once slight soil moisture returns.
The Ring Method and Why Fertilizer Should Not Touch the Stem
The ring method is a standard technique for applying fertilizer to young fruit trees, but it is often misunderstood or executed incorrectly in the field.
A common mistake is digging a narrow, deep trench right near the stem and filling it with fertilizer. Digging trenches cuts through primary structural and feeder roots, creating open root wounds. Concentrating chemical fertilizer inside a trench creates a high-salt barrier that burns any roots attempting to grow through it.
       INCORRECT APPLICATION                 CORRECT APPLICATION

             /-----\                               /-----\
            /       \                             /       \
           | CANOPY  |                           | CANOPY  |
            \       /                             \       /
        -----+-----+-----                     -----+-----+-----
             | STEM|                               | STEM|
        =====|=====|=====                     =====|=====|===== Soil Line
        |  X |  X  | X  |                     |    |     |    |
        | Deep trench   |                     | Broad band under |
        | near stem     |                     | outer dripline   |
        | cuts roots    |                     | over moist mulch |
How to Correctly Apply the Ring Method
The placement ring must shift outward as the tree grows. The target zone is the outer half of the canopy shade line, extending roughly 30 to 50 centimetres beyond the dripline. This area contains the highest concentration of active root tips.
- Locate the outer edge of the branch canopy (the dripline).
- Measure a zone starting halfway from the trunk to the dripline, and extend it slightly past the dripline.
- Distribute the measured fertilizer evenly across this circular ring band.
- Ensure no fertilizer granule rests against the trunk base.
Placed against the trunk base, chemical fertilizers pull moisture directly out of the bark and root collar via osmosis. This causes bark cracking, root collar necrosis, and sap bleeding. These chemical burns weaken the tree’s natural defenses, creating entry points for Phytophthora collar rot and bark-boring insects.
Young Avocado Trees: Establishment to Year Three
Managing young avocado trees requires a different approach than fertilizing mature, bearing orchards. During the first three years after field planting, the goal is to build structural wood, establish a deep canopy framework, and promote an expansive root network.
Physiology of the Young Tree
A young, grafted avocado seedling transitioning from nursery bags to open field conditions experiences transplant shock. Its root system is small and restricted to the volume of the original root ball. The tree lacks large carbohydrate reserves in its stem to recover from chemical stress or root loss.
                   YOUNG TREE FERTILIZATION ZONE
                     (Years 1 to 3 Establishment)

                             /-----\
                            /       \
                           | CANOPY  |
                            \       /
                      -------|-----|-------
                             | TRUNK|
                             |      |
  ---------------------------+------+--------------------------- Soil Line
     NO FERTILIZER |    APPLY BROAD BAND     | NO FERTILIZER
     OUTSIDE ROOT  |    INNER TO OUTER       | OUTSIDE ROOT
     ZONE          |    DRIPLINE ZONE        | ZONE
                   |  (Keep 20-30cm clean)   |
  ~~~~~~~~~~~~~~~~~|~~~~~~~~~~~~~~~~~~~~~~~~~|~~~~~~~~~~~~~~~~~~
                   |    ACTIVE NURSERY &     |
                   |    NEW ROOT EXPANSION   |
                   +-------------------------+
Common Errors When Fertilizing Young Trees
Fertilizing at Planting Time: Placing synthetic nitrogen fertilizers (such as CAN, Urea, or high-N NPK formulas) into the planting hole burns delicate root tips, causing seedling death within weeks.
Over-fertilizing: Applying large quantities of chemical fertilizer to small trees creates severe salt stress, causing leaf margin scorch, defoliation, and stem dieback.
Piling Fertilizer Around the Stem: Placing fertilizer near the stem burns the tender root collar, leading to ring-barking and tree mortality.
Fertilizing Stressed or Unwatered Trees: Applying chemical fertilizer during dry spells or while seedling roots are suffering from water shock accelerates leaf drop and tree decline.
Ignoring Weed Competition: Allowing aggressive deep-rooted weeds to grow around young trees robs the avocado seedling of applied nutrients and soil moisture.
When planting young trees, mix well-decomposed organic compost and rock phosphate (or a low-salt phosphatic fertilizer) thoroughly with the topsoil used to fill the planting hole. This provides phosphorus to stimulate early root extension without burning root tips. Synthetic nitrogen should only be applied after the tree has successfully established, overcome planting shock, and produced its first flush of new leaves—typically 4 to 8 weeks post-planting.
For young trees, split annual nutrient requirements into small, frequent applications every 8 to 12 weeks during moist seasons rather than giving one or two heavy applications. This maintains steady nutrient levels in the root zone and minimizes leaching losses.
Mature Hass Avocado Trees: Managing Bearing Orchards
Once an avocado orchard enters commercial bearing (typically from year four onward), the primary nutritional goal shifts from vegetative growth to maintaining tree balance, supporting flowering, maximizing fruit set, and sizing the crop.
Managing the Vegetative-Reproductive Balance
A bearing avocado tree balances two competing processes: vegetative flushes (producing shoots and leaves) and reproductive flushes (producing flowers and fruit). Excessive nitrogen applied prior to flowering triggers strong vegetative growth at the expense of fruit set. The tree diverts carbohydrates into shoot growth, causing flower drop and small fruit shed.
                        THE ANNUAL CYCLE BALANCE

         +----------------------------------------------------+
         |                 POST-HARVEST PHASE                 |
         |  - Replenish reserves (N, P, K, Ca, organic mulch) |
         |  - Support major root flush & structural recovery  |
         +-------------------------+--------------------------+
                                   |
                                   v
         +----------------------------------------------------+
         |                 FLOWERING & SET                    |
         |  - NO HEAVY NITROGEN (prevents flower drop)        |
         |  - Foliar Boron & Zinc to support pollen growth   |
         +-------------------------+--------------------------+
                                   |
                                   v
         +----------------------------------------------------+
         |                FRUIT DEVELOPMENT                   |
         |  - High Potassium & Calcium demand                 |
         |  - Balanced Nitrogen for fruit expansion           |
         +----------------------------------------------------+
Conversely, under-fertilizing a heavy-bearing tree causes severe nutrient exhaustion. The growing fruit crop extracts large amounts of potassium, nitrogen, phosphorus, and calcium from the leaves and stored wood reserves. If these nutrients are not replenished, the tree enters an alternate bearing cycle—producing a heavy crop one year followed by little to no crop the next, accompanied by canopy dieback.
Maintaining balance in mature orchards requires monitoring canopy growth, crop load, and seasonal timing. If a mature orchard displays thick, dark-green foliage with vigorous summer shoots over a metre long, reduce nitrogen applications. If the canopy appears sparse, light green, and lacks vigorous flushes after harvest, carefully step up balanced feeding to rebuild leaf area for the next crop.
When Should Avocado Trees Be Fertilized?
Applying fertilizer according to a rigid calendar schedule without considering rainfall, irrigation, or growth stages leads to nutrient wastage and poor tree performance. Timing must align with the tree’s natural phenological flushes.
           AVOCADO PHENOLOGICAL CYCLE & NUTRIENT TIMING

  STAGE 1: Pre-Flowering / Early Bud Break
  - Demand: High Boron, Zinc, moderate Phosphorus
  - Action: Apply foliar B & Zn; ensure root zone moisture

  STAGE 2: Flowering & Initial Fruit Set
  - Demand: Minimal soil Nitrogen; steady Calcium & Boron
  - Action: Avoid high-N soil applications; prevent root stress

  STAGE 3: Fruit Expansion & Cell Division
  - Demand: Rising Nitrogen, Calcium, and Potassium
  - Action: Split applications of balanced NPK + Calcium

  STAGE 4: Late Fruit Maturation & Oil Accumulation
  - Demand: Peak Potassium demand, lower Nitrogen
  - Action: Apply Potassium-rich formulations; maintain mulch

  STAGE 5: Post-Harvest Recovery
  - Demand: Balanced NPK, Organic Matter, Calcium
  - Action: Apply well-rotted compost, mulch, and soil amendments
Factors Determining Fertilizer Timing
Soil Moisture and Rainfall: Never apply dry chemical fertilizers to dry soil unless irrigation will follow immediately. Nutrients applied to dry topsoil sit unabsorbed, volatilizing into the atmosphere (in the case of urea) or forming localized salt concentrations.
Root Flushes: Avocado trees experience two to three major root flushes per year, typically occurring immediately after main vegetative shoot flushes settle down. Applying soil nutrients (especially phosphorus, calcium, and organic matter) just before or during a root flush maximizes absorption.
Flowering Phase: Avoid heavy soil nitrogen applications right before or during full bloom. High nitrogen during flowering shifts the tree’s hormonal balance toward vegetative growth, causing severe bloom drop.
Fruit Growth and Sizing: During fruit expansion, nutrient demand increases, particularly for potassium and nitrogen. Supplying potassium during rapid fruit development increases final fruit weight, oil percentage, and grade sizes.
Post-Harvest Period: Harvesting removes significant quantities of mineral nutrients from the farm. Applying a post-harvest fertilizer treatment along with organic compost helps rebuild nutrient reserves in the wood and roots, preparing the tree for the next flowering cycle.
Split applications are more effective than single heavy applications. Dividing the annual fertilizer allocation into three or four applications matched to growth stages reduces leaching losses, prevents root burn, and maintains steady nutrient levels in the root zone.
Fertilizer and Water Management
Fertilizer and water management are directly linked. Water acts as the solvent that dissolves solid fertilizers, converting them into ionic form so roots can absorb them. Without water, fertilizers remain locked in chemical granules; with too much water, nutrients leach beyond the shallow root zone or roots die from lack of oxygen.
                           SOIL MOISTURE BALANCE

       TOO DRY                   OPTIMAL MOISTURE               TOO WET
  +------------------+         +------------------+        +------------------+
  | - Nutrients locked|         | - Nutrients dissolved    | - Oxygen depleted|
  |   in granules    |         | - Roots respiring|        | - Root tips die  |
  | - High EC salt   |         | - Mass flow      |        | - Phytophthora   |
  |   concentration  |         |   uptake active  |        |   root rot risk  |
  | - Root dehydration         | - Balanced growth|        | - Nutrient leaching
  +------------------+         +------------------+        +------------------+
The Risks of Poor Moisture Management
Fertilizing During Drought Stress: Applying soluble fertilizer salts to moisture-stressed trees increases osmotic pressure in the root zone. Instead of taking up water, roots lose internal moisture to the salty soil, resulting in severe leaf scorch and defoliation.
Over-Irrigation and Leaching: Excessive irrigation or poor drainage flushes soluble nutrients like nitrate-nitrogen, potassium, and boron straight past the top 40 centimetres of soil where feeder roots live, wasting money and polluting groundwater.
Waterlogging and Root Death: When soil remains saturated, soil pores stay filled with water, cutting off oxygen. Within 24 to 48 hours of complete saturation, root tip respiration stops, root cells collapse, and root rot sets in. A tree in waterlogged soil cannot take up nutrients even if the soil is fertile.
Irrigation systems should be calibrated to keep the top 40 to 50 centimetres of soil consistently moist—like a wrung-out sponge—rather than cycling between waterlogged and bone-dry conditions. Maintaining steady soil moisture preserves feeder root health, ensuring continuous nutrient uptake.
Mulching Avocado Trees: Root Protection and Soil Management

Mulching is one of the most effective practices for maintaining health and productivity in an avocado orchard. It is not merely a method for suppressing weeds or disposing of organic residues; it is a fundamental soil and root restoration practice that replicates the natural rainforest environment where avocados originated.
                   THE AVOCADO ORCHARD MULCH PROFILE

  ---------------------------------------------------------------- Soil Surface
   *** LOOSE TOP MULCH LAYER *** (10-15cm Coarse Organic Material)
   - Moderates soil temperature spikes
   - Prevents soil crusting & erosion from heavy rain
  ----------------------------------------------------------------
   === DECOMPOSING HUMUS LAYER === (Rich Organic Matter Interface)
   - Feeds beneficial Trichoderma & soil bacteria
   - Provides gradual organic nutrient release
  ----------------------------------------------------------------
   ~~~ ACTIVE FEEDER ROOT ZONE ~~~ (Top 30-40cm Soil)
   - High oxygen retention & soil aggregation
   - Ideal moisture retention for continuous nutrient uptake
  ---------------------------------------------------------------- Deep Subsoil
In their natural habitat, wild avocados grow as understory trees in subtropical rainforests with a thick, decaying layer of forest leaf litter. Their shallow feeder roots colonize this rich organic layer, drawing up water, oxygen, and recycled nutrients. When cultivated in open orchards, exposed soil bakes under direct sunlight, soil temperatures soar, moisture evaporates quickly, and heavy rain crusts the surface.
Mulching restores this protective forest floor environment. Applying a suitable layer of organic material over the root zone provides several clear agronomic benefits:
Moisture Conservation: Reduces evaporation from the soil surface, keeping the topsoil moist and extending interval times between irrigation cycles or rainfall events.
Soil Temperature Moderation: Protects feeder roots from extreme heat. Direct sunlight can push bare soil temperatures above 35°C, killing delicate feeder roots. Mulch keeps soil cool, maintaining root activity throughout the day.
Prevention of Soil Crusting and Erosion: Absorbs the impact of heavy raindrops, preventing topsoil erosion, soil compaction, and surface crusting. This keeps the soil open and porous for air and water infiltration.
Organic Matter Build-Up and Soil Aggregation: As organic mulch decomposes, it feeds beneficial soil fungi, bacteria, and earthworms. This biological activity creates soil aggregates, improving structure and aeration in heavy clay soils.
Gradual Nutrient Supply: Decomposing organic mulch continuously releases trace minerals, potassium, nitrogen, and carbon into the root zone, reducing reliance on synthetic fertilizers over time.
Mulching complements fertilizer applications. Fertilizer supplies specific mineral nutrients, while mulch creates the moist, well-aerated, microbially active soil environment necessary for roots to absorb those nutrients.
Best Mulch Materials for Avocado Trees
Not all organic materials perform equally well as orchard mulch. Choosing the right mulch depends on local availability, carbon-to-nitrogen (C:N) ratio, breakdown rate, and cleanliness.
| Mulch Material | Advantages | Limitations / Risks | Best Practical Application |
| Coarse Cereal Straw (Maize stalks, Wheat straw) | High availability, slow decomposition rate, excellent soil coverage, good temperature protection | High C:N ratio can tie up nitrogen temporarily if incorporated; can harbor rodents if piled too high | Apply as a surface cover layer over moist soil; keep away from the trunk |
| Pennisetum / Napier Grass / Dry Pasture Cut | Rapidly forms a dense protective soil mat, high organic matter contribution, adds potassium | Decomposes quickly in warm climates, requiring frequent replenishment; seeds can introduce weeds if cut late | Excellent for young orchards; dry thoroughly before application |
| Avocado Prunings & Woodchips | Excellent carbon source, mimics natural forest litter, decomposes slowly, supports beneficial Trichoderma fungi | Requires a wood chipper; must be free of active fungal diseases like Verticillium or stem cankers | Ideal long-term mulch material for mature bearing orchards |
| Coffee Hulls / Rice Husks | Easy to spread, excellent aeration, slow decomposition, good moisture retention | Lightweight husks can blow away in strong winds; raw coffee hulls can contain caffeine/tannins if applied un-composted | Mix with coarser straw or apply beneath a layer of heavier mulch |
| Well-Composted Farmyard Manure | Rich in organic matter, introduces beneficial soil microflora, provides balanced micro and macro nutrients | Fresh manure burns roots, raises electrical conductivity, and introduces weed seeds or pathogens | Apply fully decomposed compost beneath a coarse carbon mulch cover |
Materials to Avoid or Use With Caution
Fresh, Hot Animal Manure: Raw poultry, cattle, or goat manure undergoes active heat decomposition, releasing toxic ammonia gas and high salt concentrations that burn shallow feeder roots.
Diseased Plant Residues: Never use trimmings from trees affected by root rot, bacterial wilt, or viral diseases, as this can spread pathogens throughout the orchard.
Fine Sawdust: Fine, un-composted sawdust packs down densely when wet, forming an airtight layer that cuts off oxygen to the root zone. High-carbon sawdust also causes severe soil nitrogen tie-back as microbes strip nitrogen from the soil to break down the wood.
Weed Material with Mature Seeds: Using un-composted weeds filled with mature seeds turns the tree drip zone into a dense weed bed, increasing weed control labor.
How to Apply Mulch Around an Avocado Tree
Applying mulch correctly requires following basic principles to protect root health and stem tissue.
Piling organic mulch directly against the trunk of an avocado tree (creating a “mulch volcano”) is a common cause of tree decline. Holding high moisture directly against the trunk bark creates a dark, humid environment that softens the stem tissue. This provides an ideal entry point for fungal pathogens like Phytophthora and Colletotrichum, leading to collar rot, bark cracking, and tree death.
       INCORRECT "VOLCANO" MULCHING                CORRECT FLAT BAND MULCHING

               /-----\                                    /-----\
              /       \                                  /       \
             | CANOPY  |                                | CANOPY  |
              \       /                                  \       /
          -----+-----+-----                          -----+-----+-----
               | STEM|                                    | STEM|
          =====|=====|=====                          =====|=====|=====
               /|  X |\                                   |  |  |
              / |  X | \                             +----+--+--+----+
             /  |    |  \                            |  FLAT LAYER   |
            / Piled against \                        | 10-15cm Deep  |
           /   trunk base    \                       |(Keep 20-30cm  |
          /  Causes collar rot\                      | clear from    |
         +---------------------+                     | trunk base)   |
                                                     +---------------+
Steps for Correct Mulch Application
Clear Existing Weeds: Remove weeds from beneath the tree canopy by hand pulling or shallow slashing before applying mulch.
Maintain a Trunk Clearance Gap: Leave a clear, un-mulched gap of 20 to 30 centimetres around the base of the trunk. The root collar must remain dry and exposed to free air circulation.
Cover the Dripline Zone: Spread the mulch evenly in a wide doughnut pattern starting 20 centimetres from the trunk and extending 30 to 50 centimetres past the canopy dripline.
Apply to an Effective Depth: Maintain a mulch layer depth of 10 to 15 centimetres for coarse materials like maize stalks or straw, and 5 to 10 centimetres for denser materials like compost or woodchips.
Keep the Mulch Layer Level: Spread the material evenly across the target area rather than mounding it.
Replenish Periodically: As the bottom layer of mulch decomposes into rich organic humus, top up the surface layer annually to maintain effective soil protection.
Mulch and Avocado Root Health
Avocado feeder roots require a precise balance of oxygen, water, and organic matter to function effectively.
Unlike the root systems of citrus or stone fruits, avocado roots possess few or no root hairs—the microscopic projections responsible for absorbing water and dissolved minerals in most plants. Instead, the avocado relies on coarse, fleshy root tips that must make direct contact with moist soil particles or decomposing organic matter to absorb nutrients.
                  AVOCADO FEEDER ROOT ARCHITECTURE

    TYPICAL PLANT ROOT                       AVOCADO FEEDER ROOT
    (With Root Hairs)                        (No Root Hairs - Fleshy Tip)
            |                                           |
            |-- Root Hair                               |-- Thick epidermal cell wall
            |-- Root Hair                               |-- Direct contact needed
            |-- Root Hair                               |   with moist organic layer
            |                                           |-- Highly oxygen-dependent
Because of this unique anatomy, avocado feeder roots have a high oxygen demand. If soil becomes compacted or waterlogged, root respiration drops, nutrient transport stops, and root tips begin to rot.
A well-managed layer of organic mulch creates optimal physical conditions for these delicate roots. The decomposing interface between the soil surface and the organic mulch creates a high-oxygen, high-humus zone where feeder roots can thrive. Feeder roots frequently grow upward into the lower decomposing layer of mulch, taking up water and nutrients in an environment protected from high surface temperatures.
However, mulching must be paired with good drainage. Applying heavy mulch over poorly drained, waterlogged clay soils can trap excessive moisture, driving out soil oxygen and creating ideal conditions for root disease. Mulch should be used to protect soil structure and conserve moisture, not to compensate for poor drainage.
Mulching and Avocado Root Rot (Phytophthora cinnamomi)
Root rot, caused by the soil-borne oomycete pathogen Phytophthora cinnamomi, is the most destructive disease affecting avocado production worldwide.
It is a common myth that organic mulch causes root rot. The pathogen Phytophthora cinnamomi is an water-borne organism present in many agricultural soils; mulch itself does not generate the disease. However, poor moisture management, waterlogging, and piling mulch against the trunk create the saturated, oxygen-poor soil conditions that allow Phytophthora to thrive.
                      ROOT ROT RISK TRIANGLE

                       PATHOGEN PRESENT
                     (Phytophthora cinnamomi)
                               /\
                              /  \
                             /    \
                            /      \
                           /        \
                          /   RISK   \
                         /    ZONE    \
                        /              \
                       /________________\
           SUSCEPTIBLE ROOT            POOR SOIL DRAINAGE
             (Oxgen Starved)          & SATURATED MOISTURE
When soil remains waterlogged, Phytophthora produces swimming spores (zoospores) that move through free soil water, attracted to chemical compounds released by stressed, damaged avocado root tips. The spores attach to root tips, germinate, and destroy the root tissue, turning crisp white roots into black, decayed strings.
Preventing Root Rot Through Soil and Mulch Management
Ensure Excellent Drainage: Plant avocado trees on raised beds or mounds (30 to 50 cm high) in areas with heavy soils or high rainfall to prevent water from pooling around the root zone.
Maintain Trunk Clearance: Always keep mulch 20 to 30 centimetres away from the base of the trunk to keep the root collar dry.
Promote Beneficial Soil Microbes: High-quality organic compost and coarse woodchip mulches encourage beneficial soil fungi, such as Trichoderma species, and suppressive bacteria that actively compete with and parasitize Phytophthora spores.
Avoid Over-Irrigation: Allow the soil beneath the mulch layer to dry out slightly between irrigation cycles to maintain root zone aeration.
Sterilize Nursery Material: Start orchards with certified disease-free seedlings to prevent introducing Phytophthora into clean soil.
If a tree shows symptoms of root rot—such as sparse yellowing leaves, twig dieback, and small wilted fruit—adding chemical fertilizer will not cure the problem. First, verify root health by digging near the dripline. If roots are black and decaying, hold back on chemical fertilizers, address soil drainage, prune back the canopy to balance root loss, and consider targeted fungicides recommended by an agronomist.
Fertilizer + Mulch + Irrigation: The Integrated System
Attempting to manage fertilizer, mulching, and irrigation as separate practices leads to inconsistent orchard performance. High yields, superior fruit sizing, and tree longevity rely on integrating all three practices into a single management strategy.
                  THE INTEGRATED ORCHARD TRIANGLE

                           FERTILIZER
                         (Nutrient Supply)
                                /\
                               /  \
                              /    \
                             /  H   \
                            /   I    \
                           /    G     \
                          /     H      \
                         /   Y I E L D   \
                        /_________________\
                   MULCH                   IRRIGATION
            (Soil & Root Health)       (Solvent & Transport)
Consider how these three practices interact in typical farm situations:
Scenario A (Fertilizer applied without adequate moisture or mulch): The farmer broadcasts expensive NPK fertilizer on bare soil during a dry spell. Intense heat volatilizes urea nitrogen into the air, while remaining salts form a concentrated layer on the dry surface. Shallow feeder roots heat up and retract from the surface, leaving the fertilizer unabsorbed.
Scenario B (Heavy mulch applied without fertilizer or drainage consideration): The farmer layers 20 centimetres of wet mulch around trees on flat, heavy clay soil with no drainage outlets. Heavy rainfall saturates the soil beneath the mulch for weeks. Oxygen is driven out of the root zone, feeder roots die from suffocation, and Phytophthora destroys the root system. The tree turns yellow and sheds leaves despite high soil organic matter.
Scenario C (Properly Integrated System): The farmer plants trees on raised mounds with clear drainage channels, applies a balanced fertilizer application beneath a 10-centimetre layer of coarse organic mulch (kept clear of the stem), and uses drip irrigation to maintain consistent soil moisture. Feeder roots colonize the cool, moist, high-oxygen layer under the mulch, absorbing applied nutrients efficiently. The tree develops a dense canopy, resists root diseases, and yields heavy, high-grade fruit.
Organic Matter and Soil Structure
Soil organic matter forms the basis of sustainable avocado production. While synthetic fertilizers supply isolated mineral ions, organic matter shapes the physical and biological soil environment required for long-term productivity.
       SYNTHETIC FERTILIZER              ORGANIC MATTER & MULCH
     - Soluble mineral ions           - Builds soil aggregate structure
     - Fast acting                    - Enhances CEC (Nutrient holding)
     - No physical soil improvement  - Increases water holding capacity
     - Potential salt stress          - Feeds beneficial microflora
How Organic Matter Improves Soil Physical Properties
Soil Aggregation and Pore Space: Organic matter acts as a biological glue, binding fine clay and silt particles into stable aggregates. This creates macro-pores that allow air and water to penetrate easily, preventing waterlogging and soil crusting.
Increased Water Retention in Sandy Soils: In coarse sandy soils, organic matter acts like a sponge, holding moisture in the topsoil and preventing rapid leaching of applied nutrients.
Enhanced Cation Exchange Capacity (CEC): Humus (fully decomposed organic matter) possesses a high CEC, providing binding sites for essential nutrients like calcium, potassium, and magnesium, preventing them from washing away during heavy rains.
Biological Suppression of Soil Pathogens: A soil rich in organic matter supports diverse populations of beneficial bacteria, actinomycetes, and mycorrhizal fungi. This diverse soil ecosystem creates natural biological competition that suppresses soil-borne pathogens like Phytophthora.
Using un-composted or wet organic materials can cause temporary problems. Microbes breaking down high-carbon materials like raw sawdust or straw consume available soil nitrogen, causing temporary nitrogen deficiency (nitrogen tie-back) in the tree until decomposition stabilizes. Always use well-decomposed compost or apply high-carbon materials strictly as a surface mulch rather than mixing them into the soil root zone.
Common Fertilizer Mistakes
Understanding common application mistakes helps farmers avoid unnecessary input expenses and tree damage.
| Common Mistake | Practical Consequence to the Tree | Corrective Management Action |
| Piling fertilizer granules against the trunk base | Bark chemical burn, root collar rot, path for fungal entry, tree death | Keep all synthetic fertilizers 20 to 30 cm away from the trunk; apply evenly in the outer canopy dripline ring |
| Applying high Nitrogen immediately before flowering | Triggers vigorous vegetative shoot growth, causing flower drop and fruit shed | Withhold heavy nitrogen applications prior to flowering; focus on boron, zinc, and balanced post-set feeding |
| Applying dry chemical fertilizer to bone-dry soil | Creates localized salt concentrations, pulling water out of root cells and burning root tips | Apply fertilizer only over moist soil or irrigate immediately after application |
| Using high chemical fertilizer rates to fix declining trees without diagnosis | Increases salt stress on surviving feeder roots, accelerating tree death if decline is caused by root rot or waterlogging | Inspect roots and check soil drainage first; address underlying root health problems before applying chemical fertilizers |
| Applying annual fertilizer in a single heavy application | Causes severe leaching losses, temporary salt shock to roots, and uneven growth flushes | Split annual fertilizer requirement into 3 or 4 smaller applications aligned with seasonal growth flushes |
Common Mulching Mistakes
While mulching offers significant benefits, improper application can create severe problems in the orchard.
       CORRECT MULCHING                         INCORRECT MULCHING

       - 10-15cm uniform layer                  - Piled high against stem ("Volcano")
       - 20-30cm gap around stem                - Dense, un-aerated layer (Sawdust)
       - Coarse, well-aerated material          - Diseased or seed-filled material
       - Placed over well-drained soil          - Placed over waterlogged clay
Piling Mulch Against the Stem: Creates a constantly wet environment around the root collar, leading to bark decay and collar rot (Phytophthora). Keep mulch 20 to 30 centimetres away from the stem.
Using Fine, Un-aerated Materials: Fine sawdust or thick un-cut grass can mat together when wet, forming an airtight barrier that cuts off oxygen to the root zone. Use coarse straw, woodchips, or prunings that allow air exchange.
Applying Mulch Over Waterlogged Soil: Traps excess water in poorly drained soils, exacerbating root suffocation and root rot. Ensure soil drainage is corrected before mulching.
Using Diseased Material: Introducing prunings from trees infected with black spot, anthracnose, or root disease spreads pathogens across the orchard. Source mulch materials from clean, healthy vegetation.
Ignoring Pest Harborages: Deep, unmanaged mulch layers placed close to tree stems can harbour rodents that chew tree bark. Maintain trunk clearance and inspect the orchard regularly.
Diagnosing a Problem Before Adding More Fertilizer
When an avocado tree displays yellowing leaves, poor growth, or dieback, avoid the temptation to automatically buy more fertilizer or foliar sprays. First, follow a systematic diagnostic process to identify the root cause of the problem.
                    SYSTEMATIC DIAGNOSTIC FLOW

                 1. OBSERVE LEAF & CANOPY PATTERN
                    - Is it whole-tree yellowing?
                    - Interveinal chlorosis?
                    - Leaf tip burn?
                                   |
                                   v
                 2. CHECK SOIL MOISTURE & DRAINAGE
                    - Is topsoil bone dry or waterlogged?
                    - Is there standing water after rain?
                                   |
                                   v
                 3. INSPECT FEEDER ROOT HEALTH
                    - Gently uncover top 15cm soil at dripline
                    - Are roots crisp, firm, and white?
                    - Or black, mushy, and decaying?
                                   |
                                   v
                 4. REVIEW PAST MANAGEMENT RECORDS
                    - Recent fertilizer rates & methods?
                    - Herbicide drift exposure?
                    - Soil pH test results?
Diagnostic Steps
Examine the Pattern Across the Tree and Orchard: Is the problem isolated to a single tree, a low-lying section of the farm, or the entire orchard? Problems that follow low elevation contours often indicate drainage issues, while uniform symptoms across the farm point to soil fertility or management practices.
Inspect the Root Zone: Carefully clear away topsoil in the dripline area down to 15 centimetres. Healthy avocado feeder roots are crisp, firm, and light tan or white at the growing tips. If feeder roots are absent, brittle, or black and slough off when touched, the primary issue is root rot or waterlogging, not a lack of fertilizer.
Assess Soil Moisture and Structure: Dig a small inspection hole near the dripline. Is the subsoil hard and dry, or saturated and foul-smelling? Soil physical conditions dictate whether roots can absorb nutrients.
Check Trunk Base and Root Collar: Look for dark, sunken lesions, sap bleeding, or bark cracking near the stem base. These signs indicate collar rot or physical bark damage.
Review Management Records: Check recent fertilizer application rates, spray applications, and herbicide use. Symptoms like leaf margin burn often result from chemical salt burn or herbicide drift rather than nutrient deficiencies.
Practical Orchard Scenarios
Scenario 1: Young Hass Tree with Pale Leaves and Stunted Growth
A farmer in Nyeri planted Hass seedlings eight months ago. The young trees display light yellow leaves, lack new growth flushes, and appear stunted. The farmer applied two handfuls of CAN fertilizer near the stems two months ago, but the trees showed no improvement.
Diagnostic Investigation: The farmer uncovers the soil around the stem base and finds fertilizer granules placed right against the stem collar. Digging revealed that the nursery root ball was dry, hard, and surrounded by un-mulched, compacted soil baked by direct sunlight. The feeder root tips showed chemical salt burn from the CAN application.
Management Plan: Stop applying chemical top-dressing directly to the stem collar. Carefully weed around the base, keeping a 20-centimetre gap from the trunk clear. Apply a light layer of well-rotted compost over the dripline area, cover it with a 10-centimetre layer of dry cereal straw mulch, and water thoroughly. Once the tree produces a fresh flush of new green leaves—indicating root recovery—apply small, split doses of balanced NPK fertilizer around the outer dripline over moist soil.
                    SCENARIO 1: RECOVERY STEPS

  [Stop Direct Stem Fertilizer] ---> [Clear Weeds & Create Stem Gap]
                                            |
                                            v
  [Apply Balanced NPK Post-Flush] <-- [Water & Apply Straw Mulch]
Scenario 2: Mature Tree with Heavy Canopy but Poor Fruit Production
An orchard owner in Murang’a has six-year-old Hass trees with dense, deep-green foliage and vigorous two-metre-long vegetative shoots. However, the trees produce few flowers, experience severe bloom drop, and set minimal fruit. The farmer has been applying high doses of nitrogen-rich manure and top-dressing every four months.
Diagnostic Investigation: The tree is in a state of excessive vegetative dominance driven by excess nitrogen. The abundant nitrogen encourages vegetative shoot growth at the expense of reproductive flower and fruit development.
Management Plan: Reduce nitrogen applications significantly. Withhold nitrogen prior to and during the flowering phase. Apply potassium and phosphorus based on a soil test to balance tree nutrition. Use foliar applications of boron and zinc prior to flower bud break to improve pollen fertility and flower retention. Prune excessive vertical water shoots to allow sunlight into the inner canopy.
                    SCENARIO 2: RECOVERY STEPS

  [Cut Excessive Nitrogen] ---> [Prune Vertical Water Shoots]
                                            |
                                            v
  [Rebalance Fruit Set] <-- [Apply Pre-Bloom Foliar B & Zn]
Scenario 3: Declining Leaves and Root Rot in Low-Lying Block
A farmer in Kisii notices several bearing trees in a low-lying section of the farm showing sparse, wilting leaves, branch dieback, and small fruit shedding. The farmer applied extra top-dressing fertilizer, but the trees continue to decline.
Diagnostic Investigation: Digging in the dripline reveals waterlogged subsoil and black, decaying feeder roots that break easily—classic signs of Phytophthora root rot accelerated by poor drainage. Adding fertilizer raised soil salinity, placing extra stress on the surviving root system.
Management Plan: Stop all synthetic chemical fertilizer applications to the affected trees. Dig drainage trenches to divert standing water away from the orchard block. Construct raised mounds around tree rows if practical. Prune back the upper canopy by 20 to 30 percent to reduce water demand on the damaged root system. Apply a light layer of woodchip mulch (kept clear of the stem) to encourage beneficial soil microbes, and consult an agronomist regarding targeted fungicide soil drenches or trunk injections.
                    SCENARIO 3: RECOVERY STEPS

  [Halt Synthetic Fertilizer] ---> [Dig Drainage Trenches]
                                            |
                                            v
  [Apply Woodchip Mulch + Prune] <-- [Address Root Disease]
Fertilizer Management Through the Production Cycle
Matching nutrient management to the tree’s development stage optimizes input costs and supports consistent annual production.
                   ANNUAL PRODUCTION CYCLE STAGES

    +---------------------------------------------------------+
    | STAGE 1: Orchard Establishment (Years 1 - 3)            |
    | Focus: Root expansion, frame building, split NPK & compost|
    +----------------------------+----------------------------+
                                 |
                                 v
    +---------------------------------------------------------+
    | STAGE 2: Pre-Flowering & Flower Bud Differentiation     |
    | Focus: Zero high-N, foliar Boron + Zinc, root moisture  |
    +----------------------------+----------------------------+
                                 |
                                 v
    +---------------------------------------------------------+
    | STAGE 3: Flowering & Fruit Set Phase                    |
    | Focus: Avoid root stress, steady water, no high-N shock|
    +----------------------------+----------------------------+
                                 |
                                 v
    +---------------------------------------------------------+
    | STAGE 4: Rapid Fruit Expansion & Sizing                |
    | Focus: High Potassium, Calcium, balanced Nitrogen       |
    +----------------------------+----------------------------+
                                 |
                                 v
    +---------------------------------------------------------+
    | STAGE 5: Post-Harvest Orchard Recovery                  |
    | Focus: Soil organic replenishment, compost, balanced NPK|
    +---------------------------------------------------------+
Key Considerations Across Production Stages
Establishment Phase (Years 1 to 3): Focus on building root volume and structural scaffold branches. Use organic compost, phosphatic fertilizers at planting, and small, frequent applications of balanced nitrogen and potassium split across moist seasons.
Pre-Flowering Phase: Avoid heavy soil nitrogen applications that trigger leafy flushes. Ensure adequate soil moisture and apply foliar boron and zinc to support pollen tube development and flower fertility.
Flowering and Fruit Set Phase: Maintain steady soil moisture beneath organic mulch. Avoid sudden chemical fertilizer applications or herbicide treatments that stress the tree during this sensitive window.
Fruit Expansion Phase: As set fruits enlarge, potassium and calcium demand peaks. Apply potassium-rich fertilizers evenly across the active root zone to support fruit sizing, dry matter development, and oil synthesis.
Post-Harvest Recovery Phase: Replenish exported nutrients after harvest. Apply well-decomposed organic compost and soil amendments, and maintain the mulch layer to prepare the tree for the next crop cycle.
Record Keeping in Avocado Orchard Management
Maintaining simple, clear records transforms orchard management from guesswork into an organized system.
Key Records to Maintain
Soil and Leaf Test Results: Store soil and leaf analysis reports chronologically to track changes in pH, organic matter levels, and nutrient trends over time.
Fertilizer Applications: Record the product type, exact application date, rate per tree, placement method, and weather conditions for every application.
Irrigation and Rainfall Logs: Track weekly rainfall totals and irrigation runs to align fertilizer timing with soil moisture availability.
Yield and Quality Data: Log total harvested fruit weight, size grade distributions, and pack-out percentages per block to evaluate the cost-effectiveness of your nutrition programme.
Phenological Dates: Record dates for main vegetative flushes, flower bud break, full bloom, fruit set, and harvest completion for each block.
                     ORCHARD RECORD-KEEPING CYCLE

   INPUT LOGS                                           OUTPUT LOGS
  - Fertilizer applied      +-------------------+      - Harvested yields
  - Dates & rates           |   SEASONAL DATA   |      - Fruit size grades
  - Rainfall & irrigation   |    EVALUATION     |      - Pack-out percent
  - Soil test history       +---------+---------+      - Input cost total
                                      |
                                      v
                        [ADJUST NEXT SEASON PROGRAMME]
Tracking input costs alongside harvested yields allows you to identify which practices yield the highest return on investment, helping refine management decisions season after season.
Cost Management and Economics of Fertilizer and Mulch
Managing inputs efficiently is key to maintaining a profitable commercial avocado orchard. Spending more money on fertilizer does not guarantee higher profits if nutrients are wasted or applied incorrectly.
       UNBALANCED HIGH-INPUT APPROACH             BALANCED AGRO-ECONOMIC APPROACH

     - Blanket heavy chemical buying           - Soil-test-guided targeted application
     - Single heavy applications (leached)     - Split applications matched to flushes
     - Unmulched baked soil (wasted water)     - Localized organic mulch (root protection)
     - High cost, variable low grade fruit     - Optimized cost, high export-grade pack-out
Economic Guidelines for Input Management
Base Buying Decisions on Soil Test Data: Avoid buying unnecessary soil amendments. If a soil test shows high phosphorus levels, stop applying phosphatic fertilizers and reallocate those funds toward potassium or organic mulch.
Factor in Application Labor Costs: Split fertilizer applications require extra labor, but the resulting increase in nutrient efficiency and fruit sizing far outweighs the additional labor cost.
Source Local Mulch Materials: Reduce transportation costs by sourcing mulch locally—such as cereal straw, dry pasture grass, or coffee husks—or by chipping brush and avocado prunings directly within the orchard.
Focus on Export Pack-out Percentage: Overall profit depends heavily on the percentage of harvested fruit that meets export size and quality standards (typically grade 12 to 18 avocados with smooth, clean skin). Balanced potassium, calcium, and boron management yields direct returns by increasing the proportion of high-value export-grade fruit.
Buying Quality Hass Avocado Seedlings and Advisory Support
A well-planned fertilizer and mulching strategy requires healthy, high-quality planting material to yield results. Starting an orchard with weak, diseased, or mislabeled nursery stock creates long-term challenges that fertilizer cannot fix.
                     ORCHARD SUCCESS FOUNDATION

   CERTIFIED HIGH-HEALTH SEEDLING           INCORRECT / WEAK SEEDLING
   - True-to-type Hass scion               - Mislabeled rootstock/scion
   - Vigorous, disease-free roots          - Root-bound or Phytophthora infected
   - Professional graft union              - Weak graft, high mortality
                 |                                      |
                 v                                      v
   [Responds to Fertilizer & Mulch]        [Stunted Growth & Tree Decline]
Key Standards for Nursery Selection
True-to-Type Varietal Identity: Ensure seedlings are grafted from verified, high-yielding Hass mother trees to guarantee commercial fruit quality.
Healthy Root Architecture: Inspect nursery stock to ensure roots are not root-bound, spiraled, or showing signs of decay inside the nursery bag.
Clean Graft Unions: Look for well-healed, smooth graft unions without severe swelling or structural weakness.
Disease-Free Nursery Management: Purchase seedlings grown in sterilized nursery media raised off the ground to prevent Phytophthora contamination.
Hardened-Off Seedlings: Ensure seedlings have been properly hardened under full sunlight before field planting.
Farmers Trend Limited operates nurseries producing certified, high-health grafted Hass avocado seedlings designed for commercial performance. Beyond supplying planting material, Farmers Trend Limited provides agronomy advisory services, helping farmers evaluate soils, design irrigation layouts, structure nutrient programmes, and implement effective orchard management practices.
Summary Comparison Tables
Major Avocado Nutrients and Their Practical Roles
| Nutrient | Primary Function in Avocado Tree | Stage of Highest Demand | Leaf Deficiency Symptom |
| Nitrogen (N) | Drives vegetative canopy growth, leaf formation, and shoot flushes | Post-harvest recovery & early fruit expansion | Uniform pale yellowing starting on older leaves |
| Phosphorus (P) | Stimulates root division, root growth, and early establishment | Planting time & early root flushes | Dull dark foliage, purplish undersides, stunted roots |
| Potassium (K) | Drives fruit sizing, oil synthesis, dry matter, and water balance | Rapid fruit sizing phase through maturity | Scorched, brown leaf margins on older leaves |
| Calcium (Ca) | Builds cell wall density, fruit firmness, and structural strength | Active root flushes & early fruit cell division | Weak fruit skin, internal breakdown, root tip dieback |
| Boron (B) | Supports pollen tube growth, flower fertility, and fruit set | Pre-flowering bud break through fruit set | Deformed fruit, seed cavity hollows, brittle tips |
| Zinc (Zn) | Regulates hormone synthesis, shoot elongation, and leaf width | Early seasonal shoot flushes | Small, narrow leaves clustered in rosettes |
Common Mistakes and Their Consequences
| Management Action | Common Mistake | Consequence to the Tree | Correct Practice |
| Fertilizer Placement | Placing fertilizer granules against the stem collar | Bark chemical burns, collar rot, pathogen entry | Apply in a broad band beneath the outer dripline ring |
| Fertilizer Timing | High Nitrogen applied right before flowering | Triggers vegetative shoot flush, causing flower drop | Withhold heavy N before bloom; apply foliar B & Zn |
| Mulch Application | Mounding mulch high against the trunk (“Volcano”) | Holds moisture against stem bark, causing collar rot | Maintain a 20–30 cm clear gap around the stem |
| Soil Moisture | Applying chemical fertilizer to bone-dry soil | Salt concentration burns feeder roots | Apply over moist soil or irrigate immediately after |
| Tree Diagnosis | Adding chemical fertilizer to trees suffering from root rot | Increases salt stress on remaining roots, accelerating dieback | Address drainage and root health before fertilizing |
Mulch Materials Comparison
| Mulch Material | Breakdown Rate | Soil Health Benefit | Primary Risk or Limitation |
| Coarse Cereal Straw | Moderate (6–12 months) | Excellent cover, temperature protection | High carbon can tie up nitrogen if mixed into soil |
| Cut Pasture Grass / Napier | Fast (3–6 months) | Adds potassium & organic matter quickly | Requires frequent reapplication; potential weed seeds |
| Avocado Woodchips / Prunings | Slow (12–24 months) | Suppressive to Phytophthora, builds long-term humus | Requires chipping equipment; avoid diseased wood |
| Coffee Hulls / Rice Husks | Moderate (6–12 months) | Good aeration, easy to spread | Light materials blow away; un-composted coffee hulls contain tannins |
| Composted Farmyard Manure | Fast-Moderate | Rich in soil microflora & macro-nutrients | Raw/un-composted manure burns roots & adds high salts |
Young vs. Mature Tree Management Considerations
| Management Factor | Young Avocado Trees (Years 1–3) | Mature Bearing Avocado Trees (Year 4+) |
| Primary Nutritional Goal | Structural wood growth, canopy & root expansion | Balanced growth, fruit set, fruit sizing, oil content |
| Fertilizer Application Frequency | Small, frequent split doses every 8–12 weeks | 3–4 strategic applications tied to growth flushes |
| Nitrogen Sensitivity | High risk of salt burn from over-application | Excess N during bloom causes flower & fruit drop |
| Potassium Requirement | Moderate (for structural frame building) | High (heavy extraction by developing fruit crop) |
| Mulch Layer Depth | 5–10 cm depth; keep 20 cm clear of stem | 10–15 cm depth; keep 30 cm clear of stem |
A Practical Avocado Fertilizer and Mulching Strategy
Building a productive, highly profitable Hass avocado orchard requires moving away from rigid, blanket calendar recommendations and adopting an integrated, observation-based management approach.
When you walk through your orchard, remember that every agronomic practice affects the entire tree system. Chemical fertilizer is not a substitute for organic soil health, mulching cannot fix poor drainage, and irrigation cannot compensate for destroyed feeder roots. Success lies in managing these practices together to create an optimal root environment.
                  THE PRACTICAL DECISION ROADMAP

  1. TEST & OBSERVE   ---> Check soil pH, drainage, and feeder root health
  2. CORRECT DRAINAGE ---> Build mounds & clear drainage channels first
  3. BUILD SOIL       ---> Apply organic compost & keep 10-15cm mulch cover
  4. FEED TARGETED    ---> Split NPK applications based on crop stage & soil tests
  5. PROTECT STEM     ---> Keep all fertilizer & mulch 20-30cm clear of trunk
  6. MONITOR RESULTS  ---> Keep records of inputs, yields, and pack-out grades
Follow this core decision-making sequence:
Start with Soil and Root Diagnostics: Conduct a professional soil test before making major fertilizer purchases. Inspect root health by digging near the dripline to check for crisp, healthy feeder roots before applying inputs.
Prioritize Drainage and Soil Structure: Correct waterlogging and poor drainage before applying fertilizers. Build raised mounds in heavy soils and dig clear drainage channels to carry excess water away from the root zone.
Build the Soil with Mulch and Organic Matter: Maintain a 10 to 15-centimetre layer of coarse organic mulch over the root zone, keeping a clear gap around the stem. Feed the soil microflora, protect feeder roots from heat, and preserve topsoil moisture.
Apply Targeted Nutrients in Split Doses: Avoid heavy single fertilizer applications. Split your annual fertilizer allocation across seasonal flushes, shifting from balanced nitrogen-phosphorus formulas during establishment to potassium and calcium-rich feeding during fruit sizing.
Protect the Stem and Root Collar: Keep chemical fertilizers and organic mulches 20 to 30 centimetres away from the tree trunk to prevent collar rot and chemical burn.
Keep Detailed Records and Adjust: Document application dates, rates, weather conditions, and pack-out yields. Use this data to refine your management strategy season after season.
By focusing on root health, soil organic matter, and balanced feeding, you create the conditions required for your Hass avocado trees to deliver heavy, consistent yields of export-quality fruit for decades to come.
Frequently Asked Questions (FAQs)
1. What is the best fertilizer for Hass avocado trees in Kenya?
There is no single best fertilizer for every farm, as soil requirements vary across locations. However, young trees generally benefit from balanced NPK formulations with elevated phosphorus to promote root development, combined with organic compost. Mature, bearing Hass trees require higher potassium levels (such as NPK formulas rich in K or Potassium Sulphate) during fruit sizing, balanced with nitrogen, calcium, and trace elements like boron and zinc. Always base your fertilizer selection on a professional soil test.
2. Can I put fertilizer directly in the hole when planting an avocado seedling?
No. Placing synthetic chemical fertilizers (such as CAN, Urea, or high-salt NPK formulas) directly into the planting hole can burn delicate seedling roots, leading to transplant shock or death. Instead, mix well-decomposed organic compost and rock phosphate (or a low-salt phosphatic fertilizer) thoroughly with the topsoil used to fill the hole. Synthetic nitrogen top-dressing should only be applied after the seedling has established and produced its first flush of new leaves.
3. How far from the trunk should I apply fertilizer on an avocado tree?
Apply fertilizer in a broad circular ring beneath the outer half of the canopy shade line, extending roughly 30 to 50 centimetres past the dripline. This is where active feeder roots are concentrated. Never apply fertilizer directly against the trunk, and keep a clear zone of at least 20 to 30 centimetres around the stem base to prevent chemical burns and collar rot.
4. What is the best mulch material for avocado trees?
Coarse organic materials such as maize stalks, wheat straw, dry pasture grass, coffee husks, and chipped avocado prunings are excellent mulch options. Coarse materials provide good temperature insulation and moisture conservation while allowing proper air exchange in the root zone. Avoid using fine, un-aerated materials like raw sawdust or fresh, un-composted animal manure, which can suffocate roots or cause nitrogen tie-back.
5. Does organic mulch cause avocado root rot?
No, mulch itself does not cause root rot. Root rot is caused by the soil-borne pathogen Phytophthora cinnamomi. However, if mulch is piled against the stem or applied over poorly drained, waterlogged soil, it can create saturated, oxygen-poor conditions that favor Phytophthora development. Keep mulch 20 to 30 centimetres away from the trunk base and ensure proper orchard drainage to prevent root rot.
6. How thick should the mulch layer be around an avocado tree?
For coarse materials like cereal straw, dry grass, or maize stalks, maintain a uniform depth of 10 to 15 centimetres. For denser materials like compost or fine woodchips, a depth of 5 to 10 centimetres is sufficient. Avoid creating thick mounds high against the trunk; spread the material evenly across the root zone.
7. Why are my young avocado leaves turning yellow even after applying fertilizer?
Yellow leaves can result from several issues other than nitrogen deficiency. Common causes include root tip burn from placing fertilizer too close to the stem, waterlogging and root suffocation from poor drainage, severe drought stress, high soil pH locking up trace minerals, or root damage from Phytophthora root rot. Inspect your feeder root health and check soil moisture before applying additional fertilizer.
8. When is the right time to fertilize mature Hass avocado trees?
Timing should align with the tree’s growth cycles and soil moisture levels. Key application windows include the post-harvest period (to replenish nutrient reserves), the early fruit expansion phase (to support fruit sizing), and seasonal root flushes. Avoid applying high doses of synthetic nitrogen immediately before or during full bloom, as this can trigger leafy shoot growth and cause flower drop.
9. Can I use fresh chicken manure on my avocado trees?
No, fresh chicken manure should not be applied directly to avocado trees. Raw chicken manure contains high levels of chemical salts and active ammonia gas that burn shallow feeder roots. It can also introduce weed seeds and pathogens. Always fully compost manure until it is dark, crumbly, odorless, and cool before applying it beneath the mulch layer around the dripline.
10. How often should young avocado trees be fertilized during the first year?
During the first year, split the annual fertilizer allocation into small, frequent applications every 8 to 12 weeks during moist growing seasons, rather than applying one or two heavy doses. This provides a steady supply of nutrients to the small root system and reduces the risk of salt burn or leaching.
11. What causes premature avocado fruit drop, and can fertilizer fix it?
Premature fruit drop can be caused by nutrient imbalances—such as excess nitrogen during flowering or deficiencies in boron, calcium, or potassium—as well as severe moisture stress, waterlogging, cold temperature snaps, or high thrips/mite pressure. While targeted foliar applications of boron and zinc before bloom and steady potassium/calcium management during fruit set help reduce drop, you must also address irrigation consistency and pest control.
12. How does soil pH affect avocado fertilizer performance?
Soil pH governs nutrient availability in the soil solution. The optimal pH range for Hass avocados is 5.5 to 6.5. In strongly acidic soils (pH below 5.0), phosphorus becomes chemically locked up, and calcium leaches away. In alkaline soils (pH above 7.5), micronutrients like zinc, iron, and boron become unavailable to roots. Applying chemical fertilizer to soil with an improper pH results in poor nutrient uptake; adjust soil pH based on test recommendations first.
13. What is the difference between soil fertilizer applications and foliar sprays?
Soil-applied fertilizers supply macro-nutrients (nitrogen, phosphorus, potassium, calcium, magnesium) needed in large quantities to build plant tissues, wood, and fruit. Foliar sprays deliver micro-nutrients (such as boron, zinc, iron, and manganese) directly through leaf pores in small quantities, providing quick corrections during critical stages like flowering. Foliar sprays complement soil applications but cannot replace proper soil fertilization and organic matter management.
14. Should I remove organic mulch during rainy seasons?
No, leave the mulch in place during rainy seasons, provided it was applied correctly with a 20 to 30-centimetre gap around the stem and the orchard has adequate drainage. Mulch protects the topsoil from erosion, prevents soil crusting from heavy rain, and supports beneficial soil biology. However, in low-lying areas prone to waterlogging, ensure drainage channels are clear so excess water drains away from mulched rows.
15. How do I know if my avocado tree is getting too much nitrogen?
Trees receiving excessive nitrogen display dark green, oversized leaves, vigorous vertical shoot growth (water shoots) over one to two metres long, sparse flowering, heavy flower and young fruit drop, and soft fruit tissue prone to post-harvest decay. If you observe these symptoms, reduce or pause nitrogen applications and rebalance nutrition with potassium, calcium, and trace elements.
16. Can I mulch avocado trees with their own fallen leaves and prunings?
Yes, fallen avocado leaves and healthy prunings are excellent mulch materials. They return organic carbon, potassium, and trace minerals back to the root zone while mimicking the natural forest leaf litter environment where avocados evolved. However, run large branch trimmings through a wood chipper first, and never use prunings from trees infected with serious stem cankers or active diseases.
17. What role does calcium play in Hass avocado fruit quality?
Calcium strengthens plant cell walls throughout the developing fruit. Adequate calcium levels reduce internal fruit breakdown, decrease susceptibility to fungal diseases like anthracnose and stem-end rot, improve skin firmness, and extend post-harvest shelf life during cold storage and export transport. Because calcium moves slowly within plant tissues, maintain steady soil moisture and adequate soil calcium during early fruit development.
18. Why is boron so important during avocado flowering?
Boron is essential for pollen grain germination, pollen tube elongation, and flower fertilization. A minor boron deficiency during flower bud break causes poor pollen viability, flower abortion, low fruit set, and misshapen or lopsided avocados. Applying a targeted foliar boron spray prior to bloom improves fruit set and symmetry.
19. How do I prevent weeds from growing through the mulch layer?
Apply organic mulch to a sufficient depth (10 to 15 centimetres for coarse straw) over weed-free soil to block sunlight from reaching weed seeds. Hand-pull or shallow-slash any persistent weeds that emerge around the edges. Avoid deep digging or tilling beneath the tree canopy, as this brings buried weed seeds to the surface and cuts shallow feeder roots.
20. How do I get expert agronomy advice for setting up my Hass avocado orchard?
For professional support on orchard establishment, soil testing interpretation, irrigation design, and customized fertilizer and mulching schedules, contact Farmers Trend Limited. They provide technical agronomy consultancy alongside certified, high-health grafted Hass avocado seedlings designed for long-term commercial productivity.
https://farmerstrend.co.ke/fruits/avocado-farming/avocado-fertilizer-and-mulching-guide/https://farmerstrend.co.ke/wp-content/uploads/2026/10/1769448776952.jpeghttps://farmerstrend.co.ke/wp-content/uploads/2026/10/1769448776952-150x150.jpegAvocado Farming# Trendingavocado fertilizer and mulching,avocado orchard management,avocado tree fertilizer,hass avocado farming,Hass avocado yields,mulching avocado trees,organic farming kenya,soil care for avocadosUnlock higher Hass avocado yields with smart avocado fertilizer and mulching techniques. Learn root protection, timing, and soil health tips for maximum profit.Avocado Fertilizer and Mulching: How to Improve Tree Growth, Root Health and Fruit Production Walk into two neighbouring Hass avocado orchards in Murang’a, Embu, or Kisii, and...FarmersTrendjohn doefarmerstrend@gmail.comAdministratorFarmers Trend Ltd.




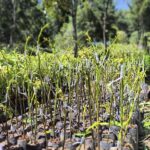



Leave a Reply